

Westinghouse Outdoor Timer Instructions: A Comprehensive Guide (Updated 02/18/2026)

Today’s date is 02/18/2026 09:07:05 (). This guide provides detailed instructions for various Westinghouse outdoor timers, including models 28011, TM263, and 28483, sourced from waterheatertimer.org, manualsLib, YouTube, and pdfFiller.
Westinghouse outdoor timers offer convenient automation for your exterior lighting and appliances. These timers, like the popular 6-outlet stake timer (model 28011) and the 2-outlet daily digital timer (TM263), simplify managing electrical devices on a schedule. Resources like waterheatertimer.org provide downloadable manuals, while YouTube channels such as weldingandstuff offer visual tutorials.
Whether you need to illuminate your landscape, power holiday decorations, or control a water feature, Westinghouse timers provide a reliable solution. Understanding the specific features of each model – including digital versus mechanical operation, photocell functionality, and outlet capacity – is key to maximizing their benefits. pdfFiller also assists with accessing and completing timer-related forms.
Understanding Common Westinghouse Timer Models
Westinghouse offers a variety of outdoor timers to suit different needs. Model 28011 is a 6-outlet stake timer, ideal for multiple low-wattage lights. The TM263 is a 2-outlet daily digital timer, perfect for simple on/off schedules. A heavy-duty digital photocell timer (like model 28483) adds light-sensing capabilities.
Each model has unique programming methods; the 28011’s instructions are available at waterheatertimer.org. ManualsLib hosts the TM263 operating instructions. Understanding these differences is crucial. Resources like YouTube (weldingandstuff) demonstrate setup, and pdfFiller aids in accessing relevant documentation for each specific Westinghouse timer model.
Model 28011: 6-Outlet Stake Timer
The Westinghouse 28011 is a popular 6-outlet stake timer designed for outdoor use. It allows users to automate lights and decorations with ease. Detailed instructions for programming this model are readily available online at waterheatertimer.org, providing a downloadable PDF manual. This timer is particularly useful for seasonal displays or security lighting.

Users can set specific on and off times for each outlet, creating customized schedules. The stake design allows for easy ground placement. Remember to consult the manual for proper setup and safety precautions, ensuring reliable operation of your outdoor lighting system.
Model TM263: 2-Outlet Daily Digital Timer

The Westinghouse TM263 is a 2-outlet daily digital timer, ideal for controlling two separate electrical devices on a daily schedule. ManualsLib hosts the official operating instructions for this model, available for download as a PDF. This timer features a user-friendly interface for setting on and off cycles, making it simple to automate indoor or sheltered outdoor lighting.
The TM263 allows for precise control over when devices are powered, enhancing convenience and potentially saving energy. Understanding the display icons is crucial for effective programming, as detailed in the manual.
Model 28483: Timer Instructions Overview
The Westinghouse model 28483 timer instructions are readily available online through platforms like pdfFiller, simplifying the process of setup and operation. This model, while details are less specific in the provided sources, is part of the broader Westinghouse outdoor timer family. pdfFiller allows users to easily fill out and electronically sign related documentation.
Accessing these instructions ensures users can correctly configure the timer for their specific needs. While a dedicated manual wasn’t directly linked, pdfFiller streamlines access to forms and guides related to Westinghouse timers.
3-Outlet Heavy Duty Digital Photocell Timer
Westinghouse’s 3-Outlet Heavy Duty Digital Photocell Timer offers automated control of outdoor lighting and appliances, responding to natural light levels. Hunker provides instructions for this specific model, highlighting its ability to turn devices on at dusk and off at dawn.
The photocell functionality eliminates the need for manual adjustments based on changing seasons. This timer is designed for heavy-duty applications, capable of handling larger electrical loads. Understanding the photocell’s sensitivity is key to optimal performance, ensuring lights activate at the desired times.

Key Features of Westinghouse Outdoor Timers
Westinghouse outdoor timers boast a range of features designed for convenience and reliability. These include both digital and mechanical options, catering to different user preferences. A significant advantage is their outlet capacity and heavy-duty design, capable of powering multiple devices or appliances with higher wattage requirements.
Many models incorporate photocell functionality (light sensing), automatically adjusting operation based on ambient light. This feature is particularly useful for outdoor lighting, ensuring energy efficiency and security. These timers offer a blend of automation and durability for outdoor use.
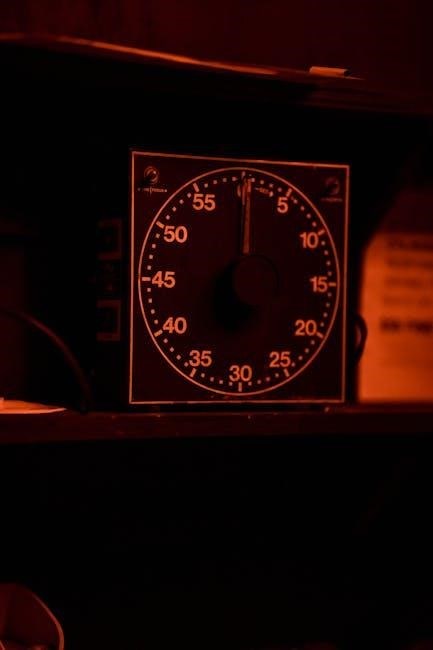
Digital vs. Mechanical Timers
Westinghouse offers both digital and mechanical outdoor timers, each with distinct advantages. Digital timers, like the TM263, provide precise programming capabilities, allowing for customized on/off schedules down to the minute. They often feature LCD displays for easy setting and review.
Mechanical timers, while simpler, are known for their robustness and lack of reliance on batteries. They operate using a rotating dial to set on/off periods. The choice depends on the desired level of control and preference for simplicity versus advanced features.
Outlet Capacity and Heavy-Duty Design
Westinghouse outdoor timers are available with varying outlet capacities, ranging from two-outlet models like the TM263 to six-outlet options such as the 28011 stake timer, and even three-outlet heavy-duty versions. This allows users to control multiple devices with a single timer.
These timers boast a heavy-duty design, built to withstand outdoor conditions and handle substantial electrical loads. They are ideal for powering landscape lighting, holiday decorations, and other outdoor appliances, ensuring reliable performance.
Photocell Functionality (Light Sensing)
Certain Westinghouse timers, like the 3-Outlet Heavy Duty Digital Photocell Timer, incorporate photocell technology. This feature automatically turns devices on at dusk and off at dawn, eliminating the need for manual scheduling based on time.
The photocell senses ambient light levels, providing convenient and energy-efficient operation for outdoor lighting. Sensitivity adjustments are often available, allowing users to customize the activation threshold based on their specific environment and desired lighting schedule. Troubleshooting may be needed if the photocell malfunctions.
Initial Setup and Safety Precautions
Before using your Westinghouse outdoor timer, ensure proper setup and adherence to safety guidelines. Grounding is crucial for electrical safety, protecting against shocks and ensuring stable operation. These timers are designed for weather resistance, suitable for outdoor use, but avoid submerging them in water.
Always verify the maximum load capacity of the timer before connecting appliances. Exceeding this limit can damage the timer and connected devices, potentially creating a fire hazard. Carefully review the manual for specific wattage limitations and safe operating procedures.
Grounding Requirements
Proper grounding is paramount for the safe operation of your Westinghouse outdoor timer. The timer’s grounding pin must be securely connected to a properly grounded outlet. Never remove or bypass the grounding pin, as this eliminates a critical safety feature. Grounding provides a path for fault current, minimizing the risk of electric shock and preventing potential damage to connected devices.
If using an extension cord, ensure it is a heavy-duty, three-wire cord with a grounding plug. Inspect the cord regularly for damage. A faulty or improperly grounded system can create a serious electrical hazard, so prioritize safety during installation.
Weather Resistance and Outdoor Use
Westinghouse outdoor timers are designed for outdoor use, but specific models offer varying degrees of weather resistance. Ensure the timer is appropriately rated for your climate and exposure to the elements. Avoid direct exposure to excessive moisture, such as prolonged submersion or heavy rainfall directly impacting the timer’s internal components.
Inspect the timer’s housing for cracks or damage before each use. Consider using a protective enclosure for added protection in harsh weather conditions. While designed to withstand typical outdoor environments, proper care will extend the timer’s lifespan and ensure reliable performance.
Maximum Load Capacity
Understanding the maximum load capacity is crucial for safe and effective operation of your Westinghouse outdoor timer. Exceeding this limit can damage the timer and potentially create a fire hazard. Refer to your specific model’s documentation – often found at waterheatertimer.org – to determine the wattage or amperage limit.
Heavy-duty models generally support higher loads, suitable for multiple devices or appliances. Always calculate the total wattage of all devices connected to the timer and ensure it remains within the specified maximum. Never connect devices that draw more power than the timer is rated for.
Programming the Westinghouse 28011 (6-Outlet Stake Timer)
Programming the 28011 model involves accessing the programming mode, typically through a series of button presses. Refer to the manual available at waterheatertimer.org/pdf/Westinghouse-28011_Manual.pdf for precise steps. Begin by setting the current time and date, ensuring accuracy for scheduled operations.
Next, program ON/OFF schedules for each outlet, defining specific start and end times. Consider daily or weekly routines to automate your outdoor lighting or decorations. Save your settings after each adjustment to ensure they are retained. The manual provides a clear guide to navigate these functions.
Accessing the Programming Mode
To enter the programming mode on the Westinghouse 28011, locate the “SET” or “PROGRAM” button. Press and hold this button for approximately three seconds until the display begins to flash. This indicates you’ve successfully entered the setup interface. Consult the official manual found at waterheatertimer.org/pdf/Westinghouse-28011_Manual.pdf for a visual guide.
The display will likely show the hour, which you can then adjust using the “HOUR” and “MIN” buttons. Confirm each setting by pressing “SET” again to move to the next parameter, such as minutes, day of the week, and so on.
Setting the Current Time and Date
After accessing programming mode (by holding the “SET” button), the hour digits will typically flash. Use the “HOUR” and “MIN” buttons to adjust the current hour. Press “SET” to confirm and move to minute setting. Repeat the process using “HOUR” and “MIN” to set the correct minutes.
For models requiring date setting, continue pressing “SET” until the month and day begin to flash. Adjust these values accordingly. Refer to the Westinghouse 28011 manual (waterheatertimer.org) for specific button functions and display indicators during this process. Accurate time and date are crucial for proper scheduling.
Programming ON/OFF Schedules
Once the time and date are set, you can program ON/OFF schedules. Typically, you’ll press “SET” again to enter schedule programming. Use the “HOUR” and “MIN” buttons to define the first ON time, then press “SET” to confirm. Next, set the OFF time using the same buttons and “SET” confirmation.
Repeat this process for each desired ON/OFF cycle. The Westinghouse 28011 allows for multiple schedules. Consult the manual (waterheatertimer.org) for details on the maximum number of schedules and any specific programming limitations. Ensure schedules align with your desired lighting or appliance operation.
Programming the Westinghouse TM263 (2-Outlet Daily Digital Timer)

The Westinghouse TM263, a 2-outlet daily digital timer, utilizes a straightforward programming method. Referencing the operating instructions manual (ManualsLib), begin by pressing the “PROG” button to access programming mode. The display will indicate the current program. Use the “HOUR” and “MINUTE” buttons to set the desired ON time for the first outlet.
Press “PROG” again to cycle through and set the OFF time, then repeat for the second outlet. The TM263 operates on a daily cycle, so these settings will repeat each day. Remember to confirm your settings before exiting programming mode.
Understanding the Display Icons
The Westinghouse TM263’s display icons are crucial for understanding its operation. According to the operating instructions manual (ManualsLib), a clock icon indicates the current time. A sun icon represents the ON time, while a moon icon signifies the OFF time for each outlet. The “PROG” icon illuminates when in programming mode, allowing for schedule adjustments.
Pay attention to the outlet indicators, showing which outlet is currently being programmed. Understanding these icons ensures accurate and efficient timer programming, maximizing convenience for your outdoor lighting and appliances.
Setting Daily ON/OFF Cycles
To set daily ON/OFF cycles on the Westinghouse TM263, first, press the “PROG” button to enter programming mode (ManualsLib). Use the “HOUR” and “MINUTE” buttons to set the desired ON time for outlet one. Press “PROG” again to move to setting the OFF time for the same outlet. Repeat this process for outlet two, establishing a personalized schedule.
Remember to confirm each setting by pressing “PROG”. This allows for customized control of your connected devices, automating their operation based on your daily needs and preferences.
Using the Override Function

The Westinghouse TM263 features an override function allowing temporary control, bypassing the programmed schedule (ManualsLib). To activate, press the “OVERRIDE” button. This will instantly turn the selected outlet ON, regardless of its scheduled state. The override remains active until the next scheduled ON/OFF time or until manually deactivated.
Deactivation is typically achieved by pressing the “OVERRIDE” button again, returning the timer to its programmed routine. This function is ideal for situations requiring immediate power or interruption outside the regular schedule.
Utilizing the Photocell Feature
Westinghouse timers with photocells (light sensors) automatically operate lights based on ambient light levels (Hunker). The photocell detects darkness and activates the connected devices, turning them off when daylight returns. This feature enhances security and convenience, eliminating manual operation.
The sensitivity of the photocell can often be adjusted to suit specific needs. Lower sensitivity triggers activation earlier in the evening, while higher sensitivity requires deeper darkness. Proper adjustment ensures optimal performance and prevents unwanted activation during twilight or bright conditions.
How the Photocell Works
The Westinghouse photocell feature utilizes a light-sensitive resistor within the timer (Hunker). This resistor’s electrical resistance changes based on the amount of light it receives. When darkness falls, the resistance increases, triggering the timer to switch on the connected lights or devices. Conversely, as daylight returns, the resistance decreases, causing the timer to turn off the power;
Essentially, the photocell acts as a light-activated switch, automating outdoor lighting without manual intervention. This system provides energy savings and enhanced security by ensuring lights are only active when needed, responding directly to natural light conditions.
Adjusting Photocell Sensitivity
Westinghouse timers with photocell functionality often include a sensitivity adjustment dial or setting (Hunker). This control allows users to customize the level of darkness required to activate the timer. Turning the dial towards higher sensitivity means the lights will turn on with less ambient light, ideal for areas with significant light pollution.
Lowering the sensitivity requires a greater degree of darkness before activation, suitable for locations with minimal external lighting. Careful adjustment ensures the photocell responds appropriately to the specific environmental conditions, optimizing performance and preventing unwanted activation during twilight hours.

Troubleshooting Photocell Issues
If your Westinghouse timer’s photocell isn’t functioning, first ensure it’s not obstructed by debris or shadows. Dirty lenses can prevent accurate light detection. Verify the sensitivity is appropriately adjusted for the environment; extreme settings can cause malfunctions. Check for proper wiring and power supply to the timer itself.
If issues persist, the photocell sensor may be defective and require replacement. Confirm the timer isn’t in “override” mode, which bypasses the photocell function. Finally, consult the official Westinghouse manual (waterheatertimer.org) for specific troubleshooting steps related to your model.
Troubleshooting Common Issues
Encountering problems with your Westinghouse timer? A frequent issue is the timer failing to turn on or off as scheduled. Double-check the programmed schedule and ensure the correct time and date are set. Incorrect time displays often indicate a low battery or a reset; replace the battery or reprogram.
Photocell malfunctions can also occur; verify no obstructions block the sensor. If problems persist, consult the official Westinghouse manuals (waterheatertimer.org) or explore YouTube tutorials (weldingandstuff) for model-specific guidance. pdfFiller can assist with accessing manuals.
Timer Not Turning On/Off
Is your Westinghouse timer unresponsive? First, meticulously review your programmed ON/OFF schedule. Ensure the current time and date are accurately set, as incorrect settings are a common cause. Verify the timer hasn’t been accidentally switched to the “Override” function (relevant for TM263 models).
Check the power source and ensure the connected devices are within the timer’s maximum load capacity. If using a stake timer (like model 28011), confirm a secure connection. Refer to the official manuals at waterheatertimer.org for detailed troubleshooting steps.
Incorrect Time Display
Experiencing an inaccurate time display on your Westinghouse timer? Begin by verifying the battery – a low battery can cause time discrepancies. If the timer lacks a battery, ensure a stable power connection. Carefully re-enter the current time and date, paying close attention to AM/PM settings.
For digital models (TM263, 28483), consult the manual (waterheatertimer.org) for specific reset procedures. Some models may require a full power cycle to synchronize. If the issue persists, explore YouTube tutorials (weldingandstuff) for visual guidance on time setting.
Photocell Malfunction
If your Westinghouse timer with a photocell isn’t responding to light levels, first check for obstructions blocking the sensor. Clean the lens gently with a soft, dry cloth. Verify the sensitivity setting; it might be too low or high.
A faulty photocell may require timer replacement. Refer to Hunker’s instructions for 3-outlet models. Consult the official manual (waterheatertimer.org) for troubleshooting steps specific to your model. If problems continue, consider seeking assistance from qualified electrician or contacting Westinghouse support.
Resources and Manual Downloads
Accessing comprehensive support for your Westinghouse outdoor timer is straightforward. Official manuals are readily available at waterheatertimer.org, offering detailed instructions and diagrams for various models, including the 28011.
YouTube channel weldingandstuff provides helpful tutorial videos demonstrating programming and setup. pdfFiller offers a convenient platform for accessing, filling, and signing Westinghouse timer instructions, like form 28483. ManualsLib also hosts the TM263 operating instructions. These resources ensure you can easily resolve any issues and maximize your timer’s functionality.
Official Westinghouse Manuals (waterheatertimer.org)
waterheatertimer.org serves as a central repository for official Westinghouse outdoor timer manuals; This website provides downloadable PDF versions of instructions for numerous models, including the popular 6-outlet stake timer, model 28011.
These manuals detail programming procedures, safety precautions, and troubleshooting steps. Users can find specific guidance for setting schedules, utilizing photocell features, and understanding display icons. Accessing the manual directly from this source ensures you have the most accurate and up-to-date information for your specific Westinghouse timer model.
YouTube Tutorial Videos (weldingandstuff)
The YouTube channel “weldingandstuff” offers a helpful video tutorial demonstrating how to program and set the time on Westinghouse automatic electric timers. This visual guide simplifies the process, particularly beneficial for users who prefer a step-by-step demonstration over written instructions.
The video covers essential functions, making it easier to understand the timer’s operation. Supporting the channel through Patreon is an option for viewers who find the content valuable. The tutorial also provides a direct link to purchase the Westinghouse electric timer featured in the demonstration.
pdfFiller for Manual Access

pdfFiller provides a convenient online platform for accessing and utilizing Westinghouse timer instructions, specifically the 28483 model. This service streamlines the process of filling out and electronically signing PDF documents, including timer manuals.
Users can easily modify text, add fillable fields, and apply electronic signatures directly within the pdfFiller interface. This eliminates the need for printing, scanning, and manual signing, offering a more efficient and environmentally friendly solution for managing Westinghouse timer documentation. It simplifies accessing crucial information.